Wednesday, May 25, 2016

An Introduction to Object Oriented Programming in Python - Part 9

OOP Example: Find distance from origin

Make sure you read Part 1, Part 2, Part 3, Part 4Part 5 Part 6Part 7, and Part 8 before you continue reading...

To better understand OOP you need to lay your hands on more problem examples. In this example, lets model a formula to: Find distance from origin


In python, the formula can be expressed as: (x**2 + y**2)**0.5

Now to use OOP model the above formula, we will create a class call "Point" and defines a method "distance()" to calculate the distance from origin

class Point:
    def __init__(self, x = 0, y = 0):
        self.x = x
        self.y = y

    def distance(self):
        """Find distance from origin"""
        print (self.x**2 + self.y**2) ** 0.5

p1 = Point(6,8)
p1.distance()


That is it.
Reference Materials are here

An Introduction to Object Oriented Programming in Python - Part 8

Polymorphism in Python OOP

Make sure you read Part 1, Part 2, Part 3, Part 4Part 5 Part 6 and Part 7 before you continue reading...

In practical terms, polymorphism means that if class B inherits from class A, it doesn’t have to inherit everything about class A; it can do some of the things that class A does differently (wikipedia).

Polymorphism is based on the greek words Poly (many) and morphism (forms).

Lets demonstrate polymorphism from the previous Part 7:-

Here we have two class: Cars and Bikes. Both are objects considered as Vehicles. The Cars class and the Bikes class inherit the Vehicles class. They have a activateHorn() method, which gives different output for them.

class Vehicles:
   def __init__(self, brand=""):
      self.brand = brand

   def activateHorn(self):
      pass

class Cars(Vehicles):
   def activateHorn(self):
      print "Cars Horn is: Poooooooorh!"

class Bikes(Vehicles):
   def activateHorn(self):
      print "Bikes Horn is: Piiiiiiiiih!"

a = Vehicles()
a.activateHorn()

c = Cars("Toyota")
c.activateHorn()

d = Bikes("BMX")
d.activateHorn()


If the above example isn't clear, here is another using animal objects (without inheritance).

We create two classes:  Goat and Dog, both  can make a distinct sound.  We then make two instances and call their action using the same method.

class Goat:
    def sound(self):
        print "Meeh, meeh"
 
class Dog:
    def sound(self):
        print "Woof, woof!"
 
def makeSound(animalType):
    animalType.sound()
 
 
goatObj = Goat()
dogObj = Dog()
 
makeSound(goatObj)
makeSound(dogObj)


That is the basic of polymorphism (object coming in many types or forms).

Reference Materials are here

An Introduction to Object Oriented Programming in Python - Part 7

Inheritance in Python OOP

Make sure you read Part 1, Part 2, Part 3, Part 4, Part 5 and Part 6 before you continue reading...

In python OOP, Classes can inherit functionality (methods) and properties (attributes) from other classes. Inheritance is a powerful feature in object oriented programming.

Python supports inheritance, it even supports multiple inheritance. Classes can inherit from other classes. A class can inherit attributes and behavior methods from another class, called the superclass.

Inheritance is explain in other words to be a definition of a new class with little or no modification to an existing class. It is a way to form new classes using classes that have already been defined.

The newly formed classes are called derived (or heir or child) classes, the classes that we derive from are called base (or super or parent) classes.

Important benefits of inheritance are
~ code reuse and
~ reduction of complexity of a program.

The derived class inherits features (both attributes and methods) from the base class, adding new features to it.

It should be noted that: objects only inherit the parent class methods and attributes, not instance attributes or methods.

Let’s take a look at how Inheritance works using a clear real world object (our Cars object).

General Syntax is:

class BaseClass: 
 body_of_base_class

class DerivedClass(BaseClass): 
 body_of_derived_class

class A: 
 body_of_base_class

class B: 
 body_of_base_class

class C(B): 
 body_of_derived_class

# multiple inheritance
class D(A, B): 
 body_of_derived_class

# multi level inheritance
class E(C, D): 
 body_of_derived_class


Tuesday, May 24, 2016

An Introduction to Object Oriented Programming in Python - Part 6

Encapsulation, Inheritance and Polymorphism

Make sure you read Part 1, Part 2, Part 3, Part 4, and Part 5 before you continue reading...

These are considered to be the three pillars of OOP. However, some authors may include Abstraction, Association, Containment etc as part of the OOP pillars.

Encapsulation hides the implementation details of a class from other objects.

Inheritance is a way to form new classes using classes that have already been defined.

Polymorphism is the process of using an operator or function in different ways for different data input.

Abstraction is simplifying complex reality by modeling classes appropriate to the problem.


Lets explain one after the other starting with Encapsulation.


Encapsulation in Python OOP

Encapsulation is also called "Data hiding" 

Encapsulation in an object oriented python program, prevents the data from being modified by accident. That is you can restrict access to methods and variables, this is known as data hiding (Encapsulation of data).

The terms encapsulation and abstraction (also data hiding) are often used as synonyms. They are nearly synonymous, i.e. abstraction is achieved though encapsulation. C++, Java, and C# rely on the public, private, and protected keywords in order to implement variable scoping and encapsulation

Generally speaking encapsulation is the mechanism for restricting the access to some of an objects's components, this means, that the internal representation of an object can't be seen from outside of the objects definition. 

Encapsulation gives you more control over the degree of coupling in your code, it allows a class to change its implementation without affecting other parts of the code.

Let’s start with an example.

To achieve Encapsulation in python, we make Protected and Private data (attributes and methods) since by defualt they are public.

Public, Protected and Private Data

Attributes and methods in python OOP are either Public, Protected or Private.

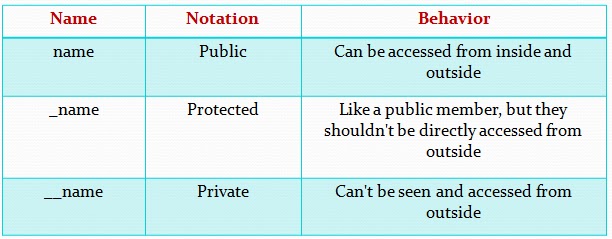
A Public attribute or method is usually written without starting with an underscore character "_". It can be accessed from outside the class, i.e. the value can be read and changed.

A Protected attribute or method is created by starting its name with one underscore character  "_". Protected members can be accessed like public members from outside of class, but they are NOT meant to be so.

A Private attribute or method is created by starting its name with two underscore characters  "__", its value cannot be accessed/changed from outside of the class. The private attribute or method can only be called within the class itself.  It can never be called from outside the class.

The following table shows the different behavior Public, Protected and Private Data


Now lets write some code to demonstrate all we have said above about Public, Protected and Private data (attribute and method) of a class in python.

Recall our Cars class from previous parts... all the attributes (brand, speed, height, weight, colour) and methods (activateHorn, moveForward, moveBack, turnRight, turnLeft) were public.

Lets make some Protected and Private data as follows:-

Attributes
Public = brand
Protected = _speed, _height
Private = __weight, __colour

Methods
Public = activateHorn
Protected = _moveForward, _moveBack
Private =  __turnRight, __turnLeft

Our code should look like this:-

class Cars:
# Create and Set the class attributes using constructor (__init__) method
 def __init__(self, brand, speed, height, weight, colour):
  self.brand = brand
  self._speed = speed
  self._height = height
  self.__weight = weight
  self.__colour = colour
  
# Create the methods with simple "print" statement in them
 def activateHorn(self):
  print ( self.brand + " Says: Poooooooorh!")

 def _moveForward(self):
  print ( self.brand + " Moving Forward at the speed of: " + self._speed)

 def _moveBack(self):
  print ( self.__colour + " " + self.brand + "  is Moving Backward!")

 def __turnRight(self):
  print ("Turning Right!")

 def __turnLeft(self):
  print ("Turning  Left!")


# Creates First object car1 and Assign the attributes value of car1 object
car1 = Cars("Toyota", "250km/hr", "1908mm", "2800kg", "Green")

# Accessing the attributes
print car1.brand
print car1._speed
print car1._height
# print car1.__weight
# print car1.__colour

# Accessing the methds
car1.activateHorn()
car1._moveForward()
car1._moveBack()
# car1.__turnRight()
# car1.__turnLeft()


Note that: Public, Protected and Private data can be accessed within the class while only Public and Protected data can be accessed outside the class definition.

That is it.

In the next Part 7, we will discus Inheritance in python OOP.


Sunday, May 22, 2016

An Introduction to Object Oriented Programming in Python - Part 5

Using "Modules" and "Import" Statement


Make sure you read Part 1, Part 2, Part 3 and Part 4 before you continue reading...

In this part, we will copy the class creation code into a module (file) named "car_class.py" and the class usage (object) code copied into another separate file named "car_object.py".

You can use whatever names for the files as long as you remember which file contains which code.

So, the two files should look like this:-

car_class.py


class Cars:
# Create and Set the class attributes using constructor (__init__) method
 def __init__(self, brand, speed, height, weight, colour):
  self.brand = brand
  self.speed = speed
  self.height = height
  self.weight = weight
  self.colour = colour
  
# Create the methods with simple "print" statement in them
 def activateHorn(self):
  print ( self.brand + " Says: Poooooooorh!")

 def moveForward(self):
  print ( self.brand + " Moving Forward at the speed of: " + self.speed)

 def moveBack(self):
  print ( self.colour + " " + self.brand + "  is Moving Backward!")

 def turnRight(self):
  print ("Turning Right!")

 def turnLeft(self):
  print ("Turning  Left!")


car_object.py


# Creates First object car1 and Assign the attributes value of car1 object
car1 = Cars("Toyota", "250km/hr", "1908mm", "2800kg", "Green")

# Creates Second object car2 and Assign the attributes value of car2 object
car2 = Cars("Honda", "180km/hr", "1500mm", "3200kg", "Cyan")

# Creates Third object car3 and Assign the attributes value of car3 object
car3 = Cars("Ford", "300km/hr", "2200mm", "4200kg", "Red")

# Call any of the methods on any of the objects to see result
car1.activateHorn()
car2.activateHorn()
car3.activateHorn()


By separating the file, we created our Cars class in "car_class.py" and "car_object.py". So, to run the code we make use of "car_object.py".

Now if you run: car_object.py, you will see a "NameError: name 'Cars' is not defined".

That is true of the error because we no longer have 'Cars' class in that module/file.

To solve this, we make use of the "import" statement. The "import" statement can take different forms as listed below;-
~ import modname
~ from modname import name1
~ from modname import *

Where "modename" is the name of the module/file we are importing in our case it is: car_class.py

So we can now edit our car_object.py module/file to look like this (if using: import modname):-

import car_class


# Creates First object car1 and Assign the attributes value of car1 object
car1 = car_class.Cars("Toyota", "250km/hr", "1908mm", "2800kg", "Green")

# Creates Second object car2 and Assign the attributes value of car2 object
car2 = car_class.Cars("Honda", "180km/hr", "1500mm", "3200kg", "Cyan")

# Creates Third object car3 and Assign the attributes value of car3 object
car3 = car_class.Cars("Ford", "300km/hr", "2200mm", "4200kg", "Red")

# Call any of the methods on any of the objects to see result
car1.activateHorn()
car2.activateHorn()
car3.activateHorn()


Or like so (if using: from modname import ...):-

from car_class import Cars
# from car_class import *

# Creates First object car1 and Assign the attributes value of car1 object
car1 = Cars("Toyota", "250km/hr", "1908mm", "2800kg", "Green")

# Creates Second object car2 and Assign the attributes value of car2 object
car2 = Cars("Honda", "180km/hr", "1500mm", "3200kg", "Cyan")

# Creates Third object car3 and Assign the attributes value of car3 object
car3 = Cars("Ford", "300km/hr", "2200mm", "4200kg", "Red")

# Call any of the methods on any of the objects to see result
car1.activateHorn()
car2.activateHorn()
car3.activateHorn()


That is it.
In the next Part 6, we will discuss the three pillars of OOP: Encapsulation, Inheritance and Polymorphism. See you there.


Friday, May 20, 2016

An Introduction to Object Oriented Programming in Python - Part 4

Using "Self" and Special Methods (Constructor)

Make sure you read Part 1, Part 2 and Part 3 before you continue reading...

The "Self" Keyword

The "self" keyword is one major difference between a method (defined inside a class) and function (defined outside a class).

"Self" keyword refers to the instance of the object been created. In other words, "self" is replaced by the name of the object when the object is created/instantiated.

The "self" is like "this" keyword in other programming languages such as C++ and PHP.

Any name can be used in place of "self", but python convention requires we use the word "self". It make your code easier to read by other python developers.

An Introduction to Object Oriented Programming in Python - Part 3

Class, Attribute, Method, and Object

Make sure you read Part 1 and Part 2 before you continue reading...

Let continue from where we stopped in Part 2.

We are about to model our car object in python code. So basically, we use the combinations of "Class", "Attribute", "Method", and "Object" to model a real world object into software code.

Lets recall the definitions for: Class, Attribute, Method, and Object

Class: A user-defined prototype/blueprint for an object that defines a set of attributes that characterize any object of the class.

The reason of creating a "class" is so we can create our own objects that have their attribute to do specific thing.
A "class" is created in python just by calling the class keyword follow by its name and a colon ( : ) at the end as seen below.

class ClassName:
 pass

Now within this class, we need to define the "Attributes" and "Methods" of our Car "Object". But before then, lets use an arbitrary example.

Attribute: A variable that is defined inside class (class attribute/variable) or inside a method (instance attribute/variable).

Method: A special kind of function that is defined in a class definition.

Lets add some attributes and methods to our arbitrary class above before we relate it to our "Car" object.

class ClassName:
 att1 = "Umar Yusuf"
 att2 = 24

 def mthd_one(self):
  att3 = "An instance attribute in Method_One"
  print att3

 def mthd_two(self):
  self.att4 = "An instance attribute in Method_Two"
  print self.att4


An Introduction to Object Oriented Programming in Python - Part 2

How to Use OOP in Python

Make sure you read Part 1 before you continue reading...

Right from the very first time you started using/learning python, you have been working with OOP concepts of “Objects” and “Methods” from classes without knowing properly about their existence.

For example;-
If you assign a string to a variable, what you did technically is that you created an object on that variable from the string class.
As seen below, the variable “name” is technically an object in python and we can call methods such as the upper() method on it.

name = "Umar Yusuf"
print type(name)  # confirms the type of object
print name.upper()  # using method on an object 

This is why it is said that: All most everything in python is an object.

Thursday, May 19, 2016

An Introduction to Object Oriented Programming in Python - Part 1

What is Object Oriented Programming (OOP)?

Object Oriented Programming (OOP) is a very broad topic to be covered in complete details in just a single blog post article. So, I will spread this Introduction to OOP across multi parts of the blog post.

In this part 1, I will introduce, define and explain OOP and some common terminologies used in OOP world with focus on Python Programming Language.

By now you should be aware that Python just like Java, C#, or PHP has a very strong support for Object Oriented Programming (OOP).

What is Object Oriented Programming (OOP)?


Wednesday, May 18, 2016

Collections of Python Object Oriented Programming (OOP) Reference Materials

Hello there,
Today, I present to you a list of some really good open source materials available on the web as far as Python Object Oriented Programming is concerned. These materials contributed majorly on the Introduction to Python Object Oriented Programming post/article series running on this blog.

Enjoy the list…

Web Pages Links

~ Programming Paradigms

~ http://en.wikipedia.org/wiki/Programming_paradigm

~ http://www.codeproject.com/Articles/845453/OOP-in-Python-part

~ http://www.codeproject.com/Articles/846958/OOP-in-Python-Part

~ http://www.python-course.eu/python3_object_oriented_programming.php

~ https://pythonspot.com/objects-and-classes

~ http://www.jesshamrick.com/2011/05/18/an-introduction-to-classes-and-inheritance-in-python/

~ https://www.jeffknupp.com/blog/2014/06/18/improve-your-python-python-classes-and-object-oriented-programming/

~ http://anandology.com/python-practice-book/object_oriented_programming.html

Web-Based Mapping with Python

Python programming language has been vastly utilized in different aspects of Geographic Information System (GIS) including web-based GIS aka web or internet mapping.

In this article, I will demonstrate how to use a python web mapping library called Folium to visualize the map of ABU Zaria Samaru Campus, in Kaduna state Nigerian (coordinate location=[11.15246, 7.65322]). So go and get the coordinate of the your place of interest if you don't want display the above location.

Note: other notable python web mapping libraries sort by descending level of simplicity includes:–

GeoDjango: To manage data in a dynamic web site
FeatureServer: More server side oriented but an OpenLayers demo
MapFish: Based on now outdated Pylons
Papyrus: the Mapfish integration in Pyramid, a well-known Python framework
GeoPandas: Based on Pandas data visualization library

Converting between Degree Minute Second (DMS) and Decimal Degree (DD)

When working with Latitudes and Longitudes in Geomatics Information Science (GIS), there two ways that degrees can be represented that is:-
~ Degree Minute Second (DMS) and
~ Decimal Degree (DD)


In this article, am going talk about converting between two representations Degree Minute Second (DMS) and Decimal Degree (DD).

Notation

The notation for DMS is as follows


The notation for DD is as follows


Tuesday, May 17, 2016

Working with Vector and Raster Data in Python

A GIS file type is a standard of encoding geographical information into a file. They are created mainly by government mapping agencies (such as the USGS or National Geospatial-Intelligence Agency) or by GIS software developers. Read more...


The two main GIS data types are Vector and Raster. These data types can easily be manipulated in common GIS software like: ArcGIS and QGIS.

However, in theis post, our goal is to work with such data types in python programming language.

According to Wikipedia and ESRI;-
Vector Data: is a representation of the world using points, lines, and polygons. Vector models are useful for storing data that has discrete boundaries, such as country borders, land parcels, and streets.

Raster Data: is a representation of the world as a surface divided into a regular grid of cells. Raster data are useful for storing data that varies continuously, as in an aerial photograph, a satellite image, a surface of chemical concentrations, or an elevation surface.
A raster data type is, in essence, any type of digital image represented by reducible and enlargeable grids.

In other to manipulate these form of GIS data in python programming language, you will need to install special libraries that can read shapefiles (vector) and Geo-tagged image or elevation data-set (raster).

Vector Data Python Libraries

For processing or manipulating shapefiles in Python, there are many modules like:-
~ osgeo/ogr
~ Fiona
~ Pysal
~ Pyshp
~ shpUtils

Raster Data Python Libraries

For processing raster some of the available modules are:-
~ osgeo/gdal
~ rasterio
~ georasters
~ rasterstats
~ lightningtrace
~ python-geotrellis
~ django-raster
~ raster2xyz


For processing geospatial geometries and 3D plotting:-
~ shapely
~ matplotlib
~ descartes
~ seaborn
~ mayavi
~ vincent


There are also modules also for processing vector and raster on web maps which give you directly the possibilities of reading and plotting a shapefile on internet based mapping platforms. They include:-
~ mapnik
~ Pycairo
~ folium
~ geodjango
~ geopandas
~ GeoVis


More libraries or modules are available on PyPi GIS

Thanks for reading.

Sunday, May 15, 2016

How to make Multiple Folders/Directories in Python

Hello,
Today, I want to discuss with you how you could create folders or directories on your PC.

You could easily create folders on your computer through the folder explorer at "New Folder".


However, it will be more efficient to use script if the folders to be created are plenty.

The OS python module is used to create and manipulate folder/directories in python. In general, this module provides a portable way of using operating system dependent functionality.

Lets take a look at THREE options or ways to create folders on our computer with python script.

Note: All the option we will discuss below assumes you are creating the folders at the same location as your script file.

Making directories or folders - OPTION 1

Lets assume that we want to create folders based on a given number of folders. The code below allows the script user to specify the number of folders he/she wants to create/make:-

import os

def main():
 dir_num = int(raw_input("Enter number of dirs to create: "))

 for dir in range(dir_num):
  dir_name = "Folder_%s" %dir # Creates the directory name
  os.mkdir(dir_name) #Creates directories in current directory
main()

If we run the code above and specify 20 as the number of directories to be created, boom! Twenty directories will be created.


Making directories or folders - OPTION 2

In this option, we have the names of the folders to be created in a list and the script creates folders based on the list content.

import os

folders = ['2001','2002','2003', '2004', '2005']

for folder in folders:
    os.mkdir(folder)


Making directories or folders - OPTION 3

Here, we want the user be able to specify the start number and end number of folders. This is useful when for example creating folders that span across some years. For instance to create folders from year 2000 to 2020.

import os

i = int(raw_input("Enter Start Number: "))
j = int(raw_input("Enter End Number: "))

while i <= j:
    os.mkdir(str(i))
    i += 1


That is it!
I hope you like the post? Be free to comment or ask question.

Thursday, May 12, 2016

Basic of ReporLab - A Python PDF Library

Working with PDF files in Python

Hi,
I like to introduce the you to “Working with PDF files in Python” using a library called ReportLab.
Reportlab is a pdf engine used by some programmers to generate pdf programmatically. Some of the ICT organisations that utilise reportlab include: Newcastle university, Wikipedia, HP, NASA etc. You can check this link to see who uses it and how they use it: www.reportlab.com/casestudies

The other time I wrote a post on How To Create PDFs with Python, then I noticed that the basics of using the library (ReporLab) wasn't detailed.

So, am using the post to discuss the: Basic of ReporLab - A Python PDF Library.

I will go over the basic concepts of using the package and then use it to solve a real world problem. To follow along, you need to install reportlab on your PC. Install it by running: pip install reportlab

To test your installation, run: import reportlab. If no error was returned, then your installation was successful.

Let me start by assuming that at least everyone reading this knows what a pdf file is?

Now it is good to know that, to generate pdf files with reportlab, u will have to import it's packages. And most of the time the packages are located at:  C:\Python27\Lib\site-packages\reportlab
A package in Python is just a folder containing scripts.

The most important package to import is the "pdfgen". So the import statement will look like this:

from reportlab.pdfgen import canvas

That is to say: from the folders (reportlab/pdfgen) import the canvas object. The Canvas object has methods to manipulate ur pdf such as: drawString, drawLine, to save your file etc.

Now let's create our first pdf file by using the canvas object and it's methods.

Create a .py file and save the code below in it:-

from reportlab.pdfgen import canvas


c = canvas.Canvas("filename.pdf")

c.drawString(100,750,"My First pdf file!")

c.save()


Now, if you check the location where you saved your .py script, you should see your generated pdf file with the name "filename.pdf" containing the string "My First pdf file!".
The string is currently written at the coordinate position of: 100,750 (x, y). Origin of the coordinate (0,0) is at bottom left corner.

Play around with the coordinate to get familiar with it.

Note: that to add string to our pdf we used the drawString() method. Another similar method to the drawString() is the drawCentredString() which centralize our string.

What we did above is just a one page pdf file, with every other settings as default.

In the next section we will discuss how to:-
1) Add Multiple pages to our pdf file
2) Add Font style and size to the string
3) Add image to our pdf file
4) Draw Line within our pdf file

Sunday, May 1, 2016

How to use python to make websites – Python Web Programming for beginners


Hi,
Lets talk about How to use python to make websites for beginners.
Several times, I have seen python beginners asked this question “Where do I use python in web development?”.

To answer this question, it is important to know that “static website pages are made with client-side programming languages such as: HTML, CSS, and JavaScript. While dynamic website pages are made with server-side languages such as: PHP, Python, Java, Asp, Pearl, Ruby, ColdFusion etc”.

Each side's programming, refers to code which runs at the specific machine, the server's or the client's.

Client-side programming is the name for all of the programs which are run on the Client. It is Uses to: Make interactive webpages, Make stuff happen dynamically on the web page, Interact with temporary storage, and local storage (Cookies, localStorage), Send requests to the server, and retrieve data from it, Provide a remote service for client-side applications, such as software registration, content delivery, or remote multi-player gaming.

Server-side programming, is the general name for the kinds of programs which are run on the Server. It is Uses to: Process user input, Display pages, Structure web applications, Interact with permanent storage (SQL, files).

PDF Library in Python – How To Create PDFs with Python

Using ReportLab with Python CSV module to Create PDF Files

Hi,
Today am going to work you through the process of generating let’s say:  “Course Completion Certificate” for any number of participants. This technique will work perfectly from one participant to hundreds and thousands of participants.

Let’s imagine a situation where you have to generate 2000 similar certificate with just few details/items changing from the template. That is to say details like; name, course title and grade will need to be unique for each generated certificate.

We are going to use the Python PDF library named: ReportLab.  It is not distributed with that standard library, so you’ll need to download it if you want to run the examples in this tutorial.
Reportlab supports most of the normal Python library installation methods. You have the option of using "pip install reporlab" or downloading the source and running “python setup.py install” or running a binary installer (on Windows).

ReportLab is used by companies such as Wikipedia, Hewlett Packard, and NASA.

Creating a Simple PDF

Let’s see how to actually create a basic pdf file! In Reportlab, the lowest-level component that’s used regularly is the canvas object from the pdfgen package which allow you to “paint” a document with your text, images, lines or whatever.

from reportlab.pdfgen import canvas
 
c = canvas.Canvas("fileName.pdf")
c.drawString(100,750,"This is my first PDF file in Reportlab!")
c.save()


The code above creates and save a .pdf file in the same working directory with the name "fileName.pdf". The "drawString" method draw text wherever you tell it to, in this case is at coordinate position (100,750). We can as well replace the content text "This is my first PDF file in Reportlab!" with a dynamic variable as we will see later.
This the very basic code to generate a pdf file with reportlab python library. You can find more tutorials and code snippet on reportlab website.